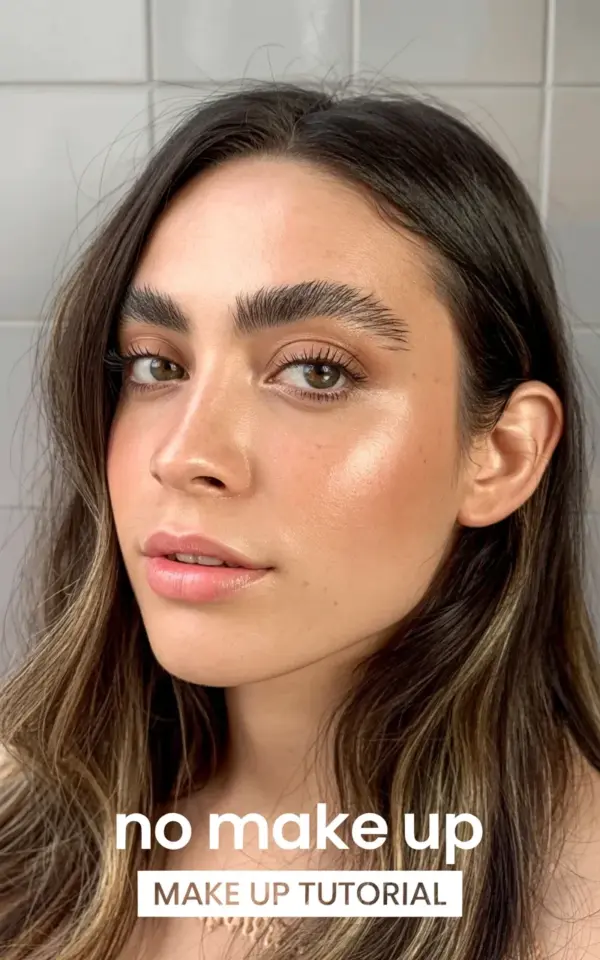
I remember the exact morning I took this photo. I was standing against that light gray tiled wall in my bathroom, hair still in loose waves from yesterday’s braid, and I had zero plans to post anything. But the light hit my cheekbones in a way that made me pause. My skin looked like skin, just slightly better, and I thought, oh, this is what natural glow actually looks like.
For years I chased a heavy full-glam look and wondered why my face felt like a mask. So this no makeup makeup tutorial came from trial and error, mostly error, and it honestly changed how I see myself. The whole point is to enhance what you already have, not rebuild your face from scratch. This article is about dewy skin that looks like you woke up like this, soft pink lip included.
Why dewy skin starts with skincare, not foundation
Here’s the thing I learned the hard way: no dewy makeup look survives a dry, flaky base. I used to pile on illuminating primers and hope they fixed my skin. They didn’t.
Instead, I spend the first five minutes of any routine on hydration. A damp face, then a light moisturizer, then a few minutes to let it sink in. If my skin feels tight, I add a facial oil, just a drop or two, pressed in with my palms. No cotton pads, because I have a weird thing about them, they always seem to drink up half the product and leave fuzz behind.
This prep is the real secret to that lit-from-within look. Makeup on hydrated skin sits differently. It blends more like a cream and less like a paste.
How to choose a lightweight base that still looks like skin
Ok so, foundation is optional. Actually, for most days, I skip it entirely and use a tinted moisturizer or a skin tint instead. The goal is a lightweight base that evens out redness without covering your freckles or natural texture.
What works for me: mix a pea-sized amount of your regular foundation with your daily moisturizer on the back of your hand. Then press it into your face with your fingers, especially around the nose where heavy foundation always goes patchy. The finish should be sheer enough that you cannot tell where makeup ends and skin begins.
In the photo, you can see that my skin still has a little shine on the nose and forehead. That is deliberate. If you over-powder those areas, you lose the whole effect. I only press a tiny amount of powder onto my chin and under my eyes, never on the high points of my cheeks.
Defined brows without the drawn-on look
Brows are where I used to get too heavy. My natural brows are already dark, so adding more pigment just made me look angry in an Instagram-filter way. Now I use a fine-tipped brow pen and draw tiny hair-like strokes only in the sparse areas. Usually just the inner half, because the outer tail already has enough shape.
If you are between brow products, here is a quick trick. Use a spoolie to brush your brow hairs upward, then set them with a clear gel. That alone adds definition. The “defined eyebrows” you see in this photo are mostly just groomed and brushed, not drawn. Less product always reads more natural.
And honestly, if a brow product looks obviously “done,” you have probably used too much. Step away from the pomade.
Soft eye makeup that adds depth without looking done
I used to wear heavy black liner every day. Now my eyes feel naked without warmth, but I refuse to go back to that harsh line. I use a single matte brown eyeshadow, something a shade or two darker than my skin, and I sweep it across my crease with a fluffy brush. That is it. It adds shadow and depth without any visible shimmer.
Then I tightline my upper waterline with a dark brown pencil. Not black, because black closes the eye down. If you want to open a tired eye, tightlining is a hidden gem. It leaves your lashes looking thicker without drawing a visible line.
For mascara, one coat on the top lashes only. I skip the bottom lashes entirely, they collect smudges and make rounds under the eyes. In this photo, my lashes are lifted and separated, honestly they look more like my eyelashes but better. That is the exact vibe you want.
A soft pink lip that melts into the rest of your look
The lip in this tutorial is not a bright pink or a matte liquid lipstick. It is a soft pink lip, somewhere between a balm and a stain, and it does not need to be perfect. I blend it with my finger so the edges are diffused. A hard-edged lip would ruin the whole effortless thing.
My current favorite is a tinted lip oil in a rosy shade. But I have also used regular lipstick and then dabbed it off with a tissue. The goal is a flush of color, not a bold statement. If your lip color is too strong, rub your lips together and tap the excess off with your fingertip.
One weird note: I always apply lip balm first and let it sit while I do everything else. That way the color glides on and has a natural sheen, like the soft glow you see in the photo.
How to set it all without killing your glow
You might be tempted to spray a matte setting spray all over. Do not do it. That will flatten the highlight and eat your glow.
Instead, use a hydrating setting spray with a dewy finish. Hold it about an arm’s length away and spritz generously. Then press your palms gently against your face to melt the makeup together. This is the easiest trick to remove powdery patches and bring back that fresh look.
If you have time, finish with a touch of liquid highlighter on the very top of your cheekbones, but only if your base is water-based. In the photo, that subtle highlight on the cheekbones comes from my moisturizer plus a tiny dab of cream highlighter. You cannot see the product itself, just the light bouncing off it.
My go-to 10 minute no makeup makeup routine
Here is the order I actually do when I am rushing and still want to look alive:
– Skincare first: damp skin, moisturizer, a drop of facial oil if needed
– Sheer base: tinted moisturizer or diluted foundation, pressed in with fingers
– Brow gel or a few hair-like strokes with a brown pen
– One matte brown shadow in the crease, tightlined upper waterline
– One coat of mascara on top lashes only
– Soft pink lip stain or lipstick, blended with a finger
– Hydrating setting spray, then press with palms
The order matters less than the restraint. If you put down the heavy foundation and embrace a little imperfection, you will get farther.
Also, keep your brushes to a minimum. Fingers are faster anyway. There is something honestly liberating about not needing a full brush roll just to leave the house.
My last piece of advice: stand in natural light when you check your makeup. Bathroom lighting is a liar. And if the mirror shows too much product, blend more, do not add more on top.
That is the whole philosophy, honestly. Less is not just more, less is actually more forgiving. Try it once and see how your face feels at the end of the day. You should feel like your skin, not like a painting. That is the real glow.
If you try this no makeup routine, let me know how your skin reacts. I would love to hear what worked and what you would skip, because everyone’s face is a little different. Come say hi in the comments.
#nomakeup #makeuptutorial #dewyglow #naturalmakeup #beautytips
Leave a Comment