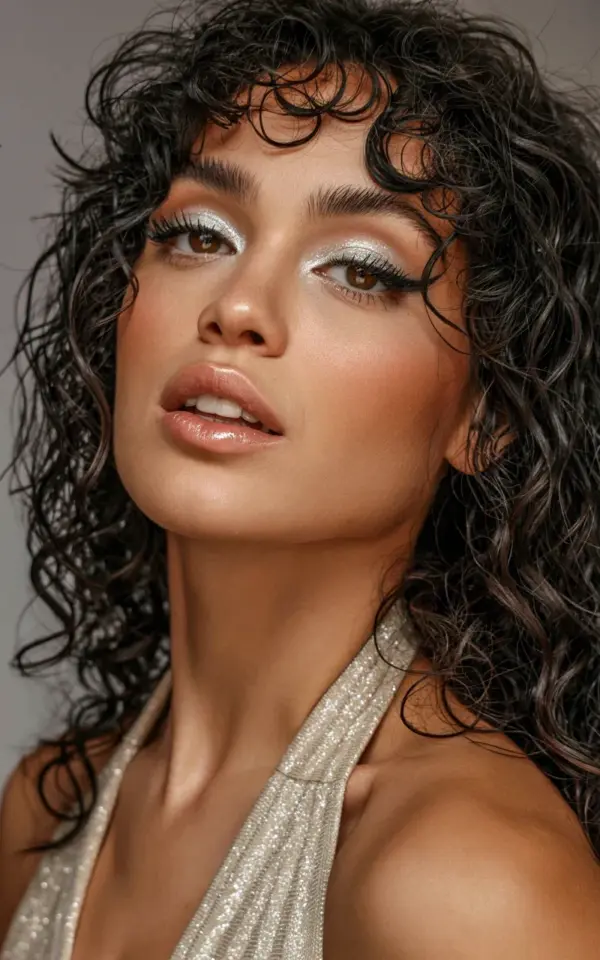
Silver glitter eyeshadow after a full face of makeup always looks different in person than it does in a photo. The camera catches every fleck of shimmer, but in real life, the look depends on your skin’s finish, your lashes, and how the light hits your face. The image that started this whole post features a woman with dark, voluminous curly hair, a silver halter top, and a gaze that feels equal parts editorial and wearable. Seeing that photo reminded me of the exact reason I started experimenting with glitter shadows in the first place: the transformation between a plain base and a shimmer-drenched lid is honestly dramatic.
Let me break down the full makeup tutorial ideas from that photo, starting from the dewy canvas and working our way up to those glossy nude lips. I will explain the before and after of each step, so you can recreate this look without overcomplicating your routine. Save this for your next night out or any moment you want to make a statement with your makeup tutorial skills.
Build a Dewy, Warm Base Before Touching the Glitter
The silver shimmer works only if your skin looks alive underneath it. In the photo, the model has a warm glow that radiates from the cheekbones, not a flat matte finish. That warmth is what prevents the cool-toned glitter from washing out her complexion.
Start with a hydrating primer and a lightweight foundation that lets your natural skin peek through. Add a cream bronzer on the high points of your face, then tap a liquid highlighter on the cheekbones and the bridge of your nose. Honesty moment: I used to skip this step and apply glitter directly onto a matte base. The result was a disconnected, almost pasted-on effect that took forever to blend away.
Do not powder the entire face. Only set the T-zone and leave the rest of your skin tacky and luminous. This creates the perfect sticky surface for the shimmer to adhere to later.
Layer Silver and White Shimmer like You Mean It
The eyeshadow itself needs more depth than just one flat swipe of silver. Look closely at the photo and you can see two distinct shades working together. A dense metallic silver sits on the center of the lid, while a brighter, almost white shimmer lifts the inner corner and the brow bone.
Here is the tutorial approach that works for me:
- Pack a silver cream shadow all over the lid first, using your ring finger for maximum pigment transfer.
- Press a loose white shimmer over the top, focusing on the inner half of the eye.
- Blend the outer edge with a soft, warm taupe to create a gradient that does not look like a solid silver block.
The difference between the before and after of this step is huge. Before you add the glitter, your eyes look simple and natural. After you add the shimmer, they catch every single light source in the room. Use a damp brush if you want the metallic finish to be even more intense, but be warned that a little product goes a long way.
Make the Glitter Eyeshadow Before and After Transition Smooth
One of the hardest parts of working with glitter is fallout. Tiny flecks of silver will land on your cheeks no matter how careful you are, and they can ruin an otherwise flawless base. The trick involves doing your eye makeup before your foundation, or at least taping off the under-eye area with a small piece of washi tape.
The photo shows a clean, bright under-eye area with no glitter scattered below the lashes. That is a sign of careful application and a decent glitter glue. Apply a dedicated glitter primer all over the lid and let it dry until it feels tacky, not wet. Then press the shimmer in place and resist the urge to swipe back and forth with your brush. Swiping only moves the particles around and creates patchy coverage.
I actually learned this the hard way during a makeup tutorial session for a friend’s birthday. I used a fluffy brush to blend the silver, and half of the glitter ended up on her nose. We laughed, wiped it off, and started over with the patting motion. The after look was completely different, sharp, clean, and truly glamorous.
Pair the Shimmer with Glossy Nude Lips for Balance
A silver eye can easily look costume-y if you pair it with a bold lipstick. The original look solves that problem with a glossy nude lip that adds just enough shine without competing for attention. The model’s lips look hydrated and smooth, with a pinky-beige tone that complements her warm skin.
Use a lip liner that matches your natural lip color, then fill in the entire lip with a creamy nude lipstick. Finish with a high-shine gloss in the center of the lower lip for that plump, reflective finish. The warm glow from the skin and the glossy lips work together to balance all the cool sparkle on the eyes. Honestly, the combination feels very modern, like something you would see backstage at a fashion week show.
An understated detail that makes a big difference: the gloss brings the whole look back down to earth. Without it, the silver glitter can feel a little distant or icy. With it, the entire face feels cohesive and wearable for a real evening out.
Style the Look for Curly Hair Glam and Night Out Wear
The photo’s subject has dark, voluminous curly hair that cascades past her shoulders, and the way it frames her face is half of the glamour. The silver halter top adds to the cool-toned aesthetic while still allowing the face to be the centerpiece. If you have curly hair, embrace it; this look was made for that texture.
The neutral gray background in the image makes the silver and white shimmer pop even more. For a real event, consider how your outfit and environment will interact with the makeup. Silver jewelry, a metallic top, or even a simple pair of statement earrings will tie everything together. The high shine on the cheekbones and the glossy lips photograph beautifully under warm, dim lighting, which is exactly what you want in a candlelit restaurant or a club.
Here is a quick packing or getting-ready tip: keep a small travel-sized glitter glue in your bag. Loose glitter can migrate throughout the night, and a quick touch-up in the bathroom mirror is easier than starting your eye makeup all over again.
Products and Tools That Make This Tutorial Easier
You do not need a professional kit to recreate this look. The essentials include a glitter glue, a silver cream shadow, a white loose pigment, a fluffy blending brush, and a lip gloss that is almost clear. The key is to choose textures that are smooth and easy to work with, rather than chunky glitter pieces that feel gritty on the lid.
Your lashes also matter more than you would think. The model has long, dark eyelashes that anchor the whole eye look. If you prefer false lashes, choose a pair with a natural band and a wispy shape. If you stick with your natural lashes, curl them well and apply two coats of a volumizing mascara. The silver shimmer looks best when it is framed by strong, defined lashes that do not disappear into the glitter.
I will say this one time: the quality of your base shadows matters. A cheaper silver glitter might apply patchy or fade within a few hours. I like to test a new shimmer on the back of my hand before committing to a full eye look, checking both the pigmentation and the fallout level. A little patience during the preparation stage keeps the before and after feeling dramatic instead of messy.
Final Touches for a Photo-Ready Finish
Once your eyes and lips are done, step back and check your reflection in natural light. The model in the photo has soft shadows under her cheekbones and a highlight that makes her features look sculpted. Add a touch of matte bronzer right under the cheekbones if you feel like the glow is too flat, and make sure your brows are brushed upward for a soft, natural frame.
One small detail that ties everything together is the inner corner highlight. A dab of the white shimmer on the inner corner makes your eyes look wider and more awake. It also connects the silver eyeshadow to the warm glow on your skin, so the whole face flows together.
This entire look is very achievable, even if you are not a professional makeup artist. The most memorable part of the before and after transformation is the moment your eyes catch the light and you see sparks of silver reflecting back. It feels a little magical, honestly.
Ready to try this look yourself? Gather your favorite shimmer shadows and a good gloss, set aside twenty minutes, and play with the silver. I hope you feel as confident and glamorous as the person in that photo. Share your own version with the world. Your night out deserves it.
Leave a Comment