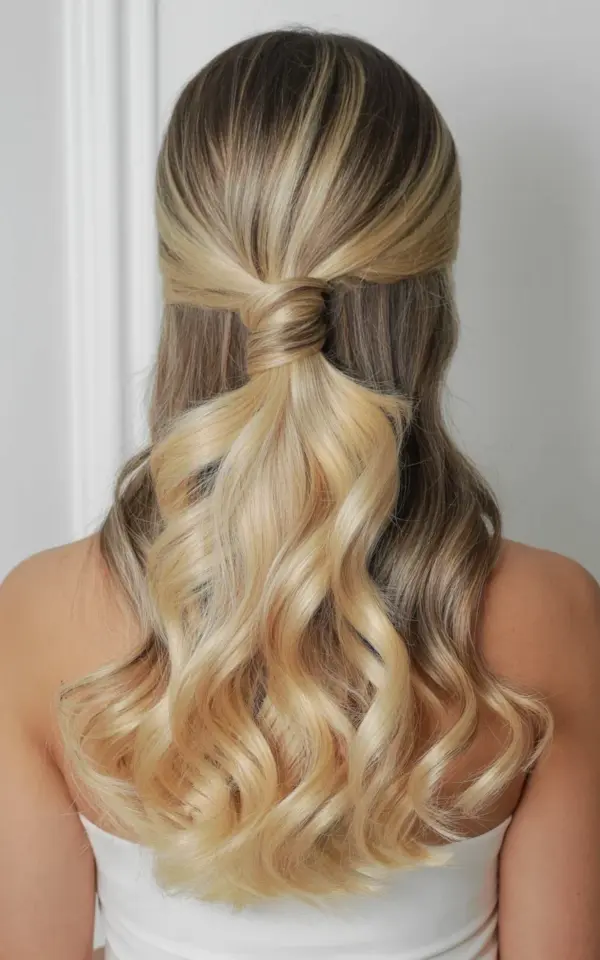
That photo in your Pinterest feed, the one with the white strapless top and the hair that looks like it smells like expensive coconut oil? Yeah, I know the one. You have probably stared at it for a full minute, trying to figure out if that glow is a filter or if human hair can actually look that healthy. It can. And the secret isn’t just the color, it’s the combination of that sleek twisted crown with the wild, cascading lengths below. This HalfUpHalfDownHairstyle is the perfect middle ground between “I tried” and “I woke up like this,” and honestly, it deserves a permanent spot in your rotation.
Why This Half-Up Half-Down Hairstyle Works So Well
There is a reason this specific style has racked up thousands of saves on Pinterest. It manages to look incredibly intricate while being totally achievable at home, which is the holy grail of hair content. The contrast is what gets me every time: you have that smooth, polished section at the crown that gives your face an instant lift, and then you let the rest of the hair just do its thing in loose, beachy waves. It creates a visual balance that is genuinely flattering on almost every face shape, whether you have a round face or a sharp jawline.
But more than the mechanics, this look is a mood. It says soft glam, but it doesnt scream for attention. The dimensional blonde here is a huge part of that vibe, those darker roots melting into golden ends adds a depth that a single flat color just cannot fake. It is the kind of style that looks just as good at a summer wedding as it does at a casual brunch with your friends.
Prep Work: Getting the Perfect Base for Dimensional Blonde Hair Color
Actually, before you even grab a curling iron, you need to sort out the texture. Beachy waves live and die by your prep products, and using the wrong ones will leave you with crunchy, stringy strands instead of that bouncy, glossy sheen you see in the photo. Start with a heat protectant, obviously, but look for one that has a bit of a flexible hold. You want to build in some grip, not stiffness.
I have a weird little obsession with mixing a drop of hair oil into my volumizing mousse before applying it. It sounds counterproductive, but the mousse gives you that root lift while the oil keeps the ends looking juicy and hydrated. Nobody wants those frizzy flyaways that ruin the ‘sleek ponytail’ effect, so make sure to brush the product through the front sections very carefully. Take your time here, this is the foundation for everything else.
Mastering the Sleek Twisted Ponytail at the Crown
Ok so here is where the magic happens. You are going to section off the top part of your hair, roughly from the top of your ears (or a bit further back for a subtler look). Pull it back just like you are making a normal pony, but I want you to stop before you pull the hair all the way through the elastic on the last loop. Leave it as a simple loop, a mini bun, to give you something to work with.
Now, take that loop and split it in half, then twist the two pieces around each other. Just wrap them around like a spiral, and then pin the ends down at the base of your crown. It takes a few tries to get the swirl to look intentional, but the beauty is that it is forgiving. You are not trying to create a perfect, recognizable shape here, you are just creating texture and dimension. The goal is that smooth, slightly messy twisted detail that sits on top of your head like a little crown.
Here is a list of what you need for this part of the process:
- One clear elastic to hold the base (no one wants a black rubber band showing through blonde hair).
- A handful of bobby pins that actually match your hair color, not the metallic silver ones.
- A tiny bit of hair wax or pomade to smooth down any baby hairs or broken pieces at your hairline.
I also learned the hard way that you should always smooth the top section before you secure it. You cant go back and fix a lumpy crown after the fact, so run a fine-tooth comb over the top of your head to flatten those bumps down. Use a bit of finishing spray on a toothbrush if your hair is being stubborn and frizzy.
Creating Cascading Beachy Waves That Look Effortless
Here is the part where we move to the bottom half of your hair, the star of the show. The trick to achieving the cascading waves in that inspiration photo is to not curl your hair in a uniform direction. You have to alternate. Take a one-inch curling wand and wrap a section away from your face, then take the next section and wrap it towards your face. This randomness is what makes the waves look like they happened naturally, rather than looking like you sat under a dryer set.
Do not curl the very ends of your hair, either. Leave the last inch or two straight. I know it sounds wrong, but this little trick takes the weight out of the ends and makes the wave look less “clampy” and more lived-in. Once you are done with all the sections, take a wide-tooth comb and gently rake through the curls to break them up. Or, my personal method, just flip your head over and shake it out like a crazy person. It works, trust me.
Finishing Touches for That Glossy Healthy Sheen
That photograph shows hair that looks like liquid gold, and that glow is not coming from a filter. It is a mix of the color jobs gloss and the finishing products you use. After you break up the waves, run a tiny drop of a luminous hair oil through the ends only. Focus the product on the lightest parts of your hair, those golden blonde ends, to really make them pop against the darker roots. It gives that instant “healthy” reflection that makes the dimensional blonde look expensive.
And let’s talk about hairspray for a second. I hate the sticky, helmet-head feeling as much as anyone, so I use a flexible hold hairspray and apply it from a distance. Spray it all over the body of the hair, but make sure you do not spray the roots of that sleek top section. You want that crown to stay smooth and flat, and you want the bottom to move and bounce. If you want extra shine, give the top section a spritz of a shine spray, just on the surface of the hair. It is a small difference, but it catches the light in a way that looks really polished.
Maintaining the Style and Root Touch-Ups
Honestly, one of the best parts about this look is that it actually gets better as it wears on. The beachy waves will start to drop a little, which makes them look even more relaxed and romantic. If you are heading out and want to refresh it after a nap, just use a bit of dry shampoo at the roots and re-smooth the twist at the crown. It is very forgiving.
But I have to be real with you about something: the roots. This style looks incredibly chic when those darker roots are intentional and freshly colored, but it looks a bit messy and unkempt if the grow-out is way past the point of “shadow root” and into “I haven’t been to the salon in eight months” territory. To keep that perfect melt from dark to light looking sharp, you will want to book a gloss service between your full color appointments. It helps blend the line of demarcation and keeps the whole thing looking soft, even as it grows out. Ask for a root smudge or a shadow root touch-up, it is the only way to keep this exact look alive for more than a month.
Anyway, this is the style I am recommending to all my friends who want that soft glam vibe without looking like they are trying too hard. Take the photo to your stylist, save it, and practice the twist a few times at home. Once you get that little trick down, you will be unstoppable. Let me know how it turns out for you!
Leave a Comment