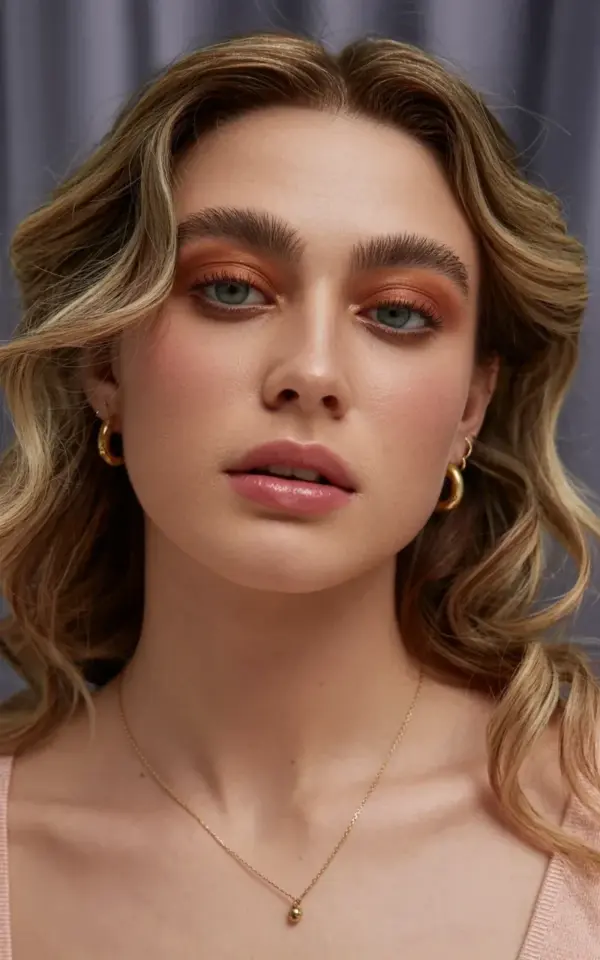
There is a specific frame in the photo where the light catches the curve of a wave and turns it almost golden. That is the exact moment this entire look clicked for me. The honey blonde curls, the glossy mauve lips, the soft dewy skin against that dark gray backdrop, it reads like a high-fashion editorial, but honestly, it is completely achievable for a regular glam day.
Look, I have saved this exact honeyblondecurls makeup look more times than I care to admit. The balance between the warm-toned eyeshadow and that soft pink flush is what separates a good makeup day from a great one. So I decided to break this aesthetic down into curated themes, each one a little different from the last. Pull up your makeup chair, grab a coffee, and let’s chat about how to build this look from scratch.
1. The Hair: Loose, Lived-In Honey Blonde Curls
First things first, let’s talk about that hair. Those are not tight ringlets or formal Hollywood waves; they are loose, bouncy curls that fall past the shoulders in a way that feels effortless. The wavy texture is the star here, it gives the whole portrait that “I woke up like this” vibe, even though we all know it took at least forty minutes and a good dry shampoo.
To get this texture at home, I would lean on a large-barrel curling wand (1.25 or 1.5 inches is perfect). Work in sections, wrap the hair away from the face, and leave the last inch or two of the ends uncurled. That little detail is what keeps it looking modern instead of pageant-ready.
The color itself is doing a lot of heavy lifting. It is a true honey blonde with warm, golden undertones. Not too ashy, not too platinum. If you are using a toning gloss, look for one with a champagne or gold base to mimic that warmth. Pinch your hair in a low ponytail afterward and let it cool completely before you brush it out with your fingers. That movement is what creates the soft, separated waves that frame the face in the photo.
2. The Skin Prep: Getting That Pink-Toned, Dewy Glow
Here is the thing about glowy makeup: it all starts with skin prep. The skin in this portrait has a luminous filter on it, but not in a greasy, sweaty way. It has a lit-from-within quality that comes from hydration and the right makeup base with pink undertones.
You want to scrub those lips too, since a glossy mauve lip will cling to dead skin like nobody’s business.
Start with a hydrating essence or a lightweight gel moisturizer, something with squalane or hyaluronic acid. Let it sit for two minutes before applying anything else. For the base, skip the heavy matte foundation. Instead, reach for a luminous, skin-tint or a light-medium coverage foundation that has a radiant finish.
Mix a tiny drop of liquid highlighter into your foundation. It softens the pigment and gives your entire face that candlelight effect. Set only your T-zone lightly with powder, and leave the high points of your cheeks alone. The camera flash (or office lighting) will catch those unpowdered areas and create that natural glow you see in the portrait.
3. Mauve Lips and the Gold Hoop Earring Formula
Can we take a second to appreciate the styling? The small gold hoop earrings and the delicate chain necklace with a tiny pendant are not just accessories. They anchor the entire look. When you have a dewy face and a glossy lip, you need a little metallic bling to give the eye somewhere to rest. I always think this look edges toward a bronzy style, use a satin-matte lipstick that is almost the same shade as your natural lip color. Blot it once with a tissue, then swipe a clear gloss on the center of your bottom lip. That creates the dimension without making it messy. I have tried low-end glosses and high-end ones for this, and honestly, a good drugstore option works just as well. Just keep the wand clean and work in thin layers to avoid that heavy, sticky feeling. The goal is a soft sheen that catches the light, not a full lip lacquer.
4. Eye Makeup: A Warm-Toned Wash That Skips the Heavy Liner
Now for the eyes. The focus here is on a warm-toned eyeshadow that covers the entire lid. You are looking for shades of soft brown and terracotta, maybe a hint of rose gold. These tones pull the honey from the hair and tie the whole makeup look together seamlessly.
Here is a little trick I use when trying to replicate this. Sweep a wash of color from lash line to crease, and blend it upward with a clean brush.
What makes this eye look stand out is the absence of harsh liner. There is no winged eyeliner, no heavy bottom lash line. Instead, the definition comes from the shadow and a good coat of mascara. I like to wiggle the mascara wand at the roots to add volume without lengthening too far. Defined eyebrows are also key here, they frame the face so the glossy lip does not overwhelm everything else. Use a brow gel with a slight tint, brush upward, and stop. Done.
5. The Main Makeup Idea: Save This For Your Next Big Outing
Honestly, if you are planning a date night, a birthday dinner, or just a “treat yourself” day in the city, this beauty portrait inspo is the perfect starting point. It is photogenic enough to pop in pictures but low-maintenance enough that you won’t be checking a mirror every five minutes. For a more casual vibe, swap the darker lipstick for a tinted balm in a similar mauve shade. A softer version works beautifully for a daytime brunch.
Here are a few specific idea boards to pull from:
– *The Casual Coffee Run:* Apply the honey waves with a texturizing spray, skip the highlighter, and use a sheer mauve lip tint.
– *The After-Work Cocktail:* Go all in. Use a slightly deeper taupe eyeshadow and add a second layer of gloss.
– *The Weekend Getaway:* Pack a mini palette with warm browns, a cream blush with pink undertones, and skip the foundation for a tinted moisturizer.
The core of the look remains the same, it is all about that soft, glamorous, slightly undone feel.
6. Matching the Tone: The Dark Gray Backdrop and Lighting
Since part of this look is the editorial quality of the photo, let’s discuss the backdrop briefly. That dark gray backdrop creates a moody contrast against the bright hair and luminous skin. If you are trying to recreate this portrait for a blog or a social media post, do not just stand against a plain white wall. The contrast is what adds the drama.
Find a spot with natural, soft window light. It has that strong side-lighting effect that picks up the texture in the curls and shows off the blend of the eyeshadow. If you are using a ring light, dial it down to about 60% and use a diffusion filter. The lighting needs to be forgiving and soft. It helps to stand about three feet away from the backdrop so the background blurs slightly, emphasizing the sharp focus of your face. That little trick shifts everything from “smartphone mirror shot” to “magazine portrait.”
7. The Accessory Trick: Why Gold Jewelry Always Wins
You cannot skip the gold hoop earrings. I have worn this exact style with a silver necklace before, and the whole vibe falls flat. Gold warms the complexion in a way that silver simply cannot. It matches the warm tones in the eyeshadow and the honey in the hair, creating a cohesive color story that makes the face pop.
When picking your jewelry, stick to small and delicate. Chunky hoops would overwhelm the softness of the look. The necklace should sit right at the collarbone, with a simple pendant that does not draw attention away from your face. This minimal styling choice is what elevates the portrait from “just makeup” to “high fashion.”
This entire look is about balance. The dewy skin balances the matte shadow; the glossy lips balance the defined brows; the gold jewelry balances the hair. Play with the tones until they feel right for your natural skin color, and you will nail this honey blonde waves look in no time. If you try these style ideas out for yourself, tag a friend.
Leave a Comment